Setting Up WaveMon on a Raspberry Pi


100 Points
Learning Objectives

These instructions will show you how to use WaveMon on a Raspberry Pi.
This software allows you to monitor local wireless networks available to a Raspberry Pi.

More information on WaveMon is available online.
Being able to use this software will greatly simplify working with the Raspberry Pi to find available wireless networks.

After completing this assignment you will be able to:

  1. Run WaveMon
  2. Interpret the results produced by WaveMon

Assignment Overview
This assignment reviews basic computer concepts that you will need in this course and throughout your career.

You are expected to have a working knowledge of SBC hardware and software.
If you do not understand how to use an item, perform a Google Search, refer to the WSU Technology Knowledge Base,  ask a teaching assistant, or ask the instructor.


Exercise 1-Prepare for WaveMon
  1. These steps are performed on the Raspberry Pi, either by using a mouse and keyboard attached directly to the Raspberry Pi, or establishing a VNC connection per IOTP02.
  2. Make sure your Raspberry Pi is connected to the WSU Guest wireless network.
    To establish a VNC connection, your laptop must be attached to the WSU network via a wired connection.
    See IOTP02 for details.
  3. If you have not run your Raspberry Pi in a while, make sure to first open a Terminal window and run these commands:
    sudo apt update
    sudo apt upgrade
    Note there may be other on-screen suggestions for commands to run.
  4. Open a browser to: https://www.raspberrypi-spy.co.uk/2014/10/how-to-use-wavemon-to-monitor-your-wifi-connection/
    and review how to use wavemon.
  5. For more details visit the wavemon GitHub site.

Exercise 2-Run WaveMon
  1. These steps are performed on your Raspberry Pi.
  2. Open a Terminal window and start the Wavemon program by entering:
    sudo wavemon
  3. After WaveMon begins, and you are at the main screen, examine and run the available functions, F1, F2, F7:

    WaveMon functionsWaveMon Function 1-Info


  4. Function 2-History:

    WaveMon history functionWaveMon Function 2-History


  5. Function 3-Scan:

    WaveMon history functionWaveMon Function 3-Scan


  6. Function 7-History:

    WaveMon preferences functionWaveMon Function 7-Preferences


  7. Run each function and examine the results.
    Modify the preferences and examine the resulting changes.

Exercise 3-ScreenShot

Take a screenshot with WaveMon running in F1-info mode to document your work.
Note: this can be done using the Snipping Tool if you are running VNC, or use the scrot command if you are connected to the Raspberry Pi with a keyboard and mouse.

  1. On the Raspberry Pi desktop, open the text editor and enter the following information:
    Your Name
    Your Class
    Todays Date
    IOT01
  2. On the Raspberry Pi, position the wavemon F1-Info window next the text editor on the desktop.
  3. Take a screenshot.
  4. On your laptop save the screenshot as "IOT01" in your '
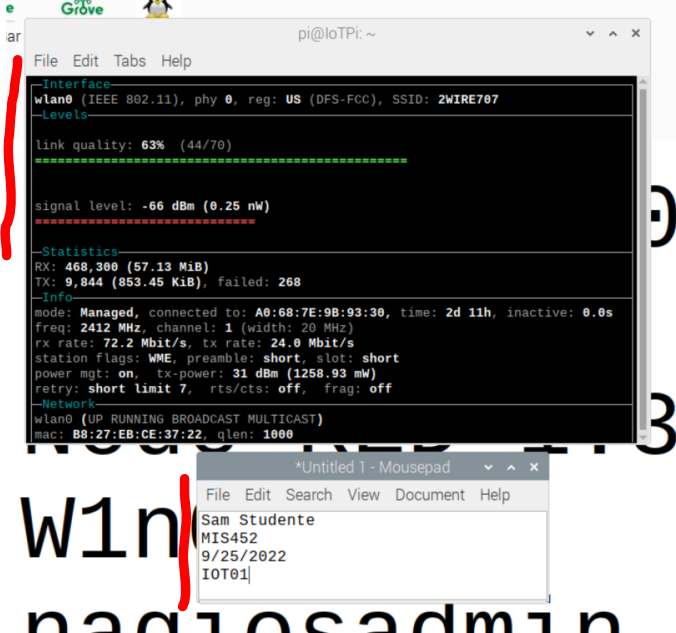
 ' folder.

sample screen shotSample Screen Shot


ScreenShot IOT01


Upload Screenshot

Submit to the appropriate D2L Assignment folder a screenshot that documents your work.


(50) 1. Upload your screenshot to the 'IOT01' D2L Assignment Folder.


Exercise 4-Reflections

Based on your experience in this exercise and what you just learned, develop a brief statement about the value of wavemon as a WiFi management tool for organizations.
Think about what type of problems these devices could solve, and would it be cost-effective?
Consider businesses that deploy IoT 'solutions', on the order of thousands or millions of devices-how can wavemon equipped Raspberry Pis support or automate these efforts?
One example is the need to monitor any and all Wi-Fi capable devices-are they authorized? are they illicit? are they sanctioned?
References:
WaveMon
How to use wavemon: https://www.raspberrypi-spy.co.uk/2014/10/how-to-use-wavemon-to-monitor-your-wifi-connection/
Wavemon GitHub site
Rogue Wireless Access Points: Israeli Bank Heist?
War Driving: Is this network secure?

(20) 2. Reflections-value


(20) 3. Reflections-signal
Using the various wavemon screens, determine the SSID with the largest signal strength:


Submit Assignment

When all tasks are completed press the Submit button.


(10) 4. Assignment submission


Congratulations! You have successfully used WaveMon, a WiFi monitoring program on a Raspberry Pi single board computer.


-- -- WHEN DONE -- --
SHUTDOWN THE RASPBERRY PI
TURN OFF THE POWER